Chad's Pictures.com - Restaurant Reviews, Travel, Automotive Guides, DIY Instructions

Toyota Camry Dome Light Replacement Guide

A picture guide on How to remove and install the burnt out dome light of the Toyota Camry

  Home Page Restaurants Travel Automotive Miscellaneous Reviews Categories
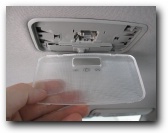
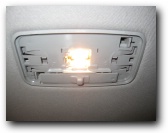
How to change the interior dome light on a Toyota Camry. This do-it-yourself (DIY) automotive guide will show you how-to change the dome light on a 2007, 2008, 2009, 2010, 2011, 2012, 2013 Toyota Camry (XV40 and XV50) L, LE, XLE, SE, XLE V6, SE V6, and Hybrid. These instructions for replacing the interior courtesy light in a Toyota Camry may also be helpful on other years of the Camry as well as similar models like the Avalon, 4Runner, Corolla, FJ Cruiser, Highlander, Land Cruiser, Matrix, Prius, Rav4, Sequoia, Sienna, Venza, Yaris, Land Rover, Lexus IS250, 
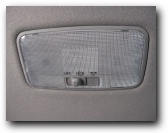
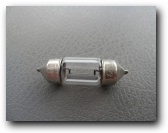
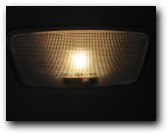
IS350, LS460, LX570 and RX350. Read Disclaimer before you attempt any repairs.

The non-sunroof dome light replacement bulb part number is DE3175 and the sunroof model uses a 194 wedge style bulb and both are available from many manufacturers like Sylvania and GE. You can also use LED replacement light bulbs and LED light kits like the PUTCO 231125 Festune bulb for aftermarket aplications.

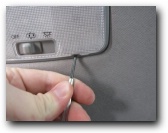
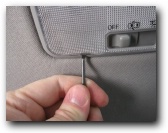
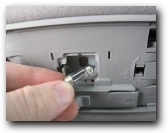
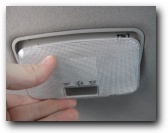
Tools needed: Small flat head screw driver.

 
Toyota-Camry-Dome-Light-Replacement-Guide-001
Toyota Camry
Toyota-Camry-Dome-Light-Replacement-Guide-002
Camry Burnt Out Dome Light
Toyota-Camry-Dome-Light-Replacement-Guide-003
Dome Light Lens Cover
The Toyota Camry dome light is located in the center of the headliner inside the cabin of the car and you will first need to use a small flat head screwdriver to pry the lens cover from the cabin dome light housing. There are two notches located at the front side of the lens cover that you can use the screwdriver to pry open the dome light cover.
Toyota-Camry-Dome-Light-Replacement-Guide-004
Pry Off Lens Cover
Toyota-Camry-Dome-Light-Replacement-Guide-005
Remove Lens Cover
Toyota-Camry-Dome-Light-Replacement-Guide-006
Removed Dome Light Cover
Once you remove the lens cover the DE3175 interior light of the Camry is exposed and can be accessed without any additional tools.
Toyota-Camry-Dome-Light-Replacement-Guide-007
Dome Light Bracket
Toyota-Camry-Dome-Light-Replacement-Guide-008
Burnt Out DE3175 Light Bulb
Toyota-Camry-Dome-Light-Replacement-Guide-009
Toyota Dome/Map Light Bulb
Using your finger press the left side metal retention clip outward to allow the light bulb to be removed. At this point you can either replace the old bulb with an OEM replacement DE3175 or use an aftermarket LED light to replace the burnt out dome light.
Toyota-Camry-Dome-Light-Replacement-Guide-010
New Working Dome Light
Toyota-Camry-Dome-Light-Replacement-Guide-011
Replace Dome Light Cover
Toyota-Camry-Dome-Light-Replacement-Guide-012
Test Dome Light Bulb
Before replacing the lens cover make sure to test the new dome light bulb to make sure it is working properly. If the dome light is not working check the filament (the metal wire in the center of the bulb) of the new bulb to make sure it is not broken. If everything is working align the lens cover with the dome light housing and press it back into place. You may also be interested in other repair how to guides I have done - How to Change the Battery in a Toyota Camry, How to Replace the Headlight in a Toyota Camry, How to Change the Map Light in a Toyota Camry, How to Change the Air Filter in a Toyota Camry, How to Change a Fuse in a Toyota Camry. For all the Toyota Camry guides in one place go to Toyota Camry Repair and Maintenance Guides.
 
  Home Page Restaurants Travel Automotive Miscellaneous Reviews Categories
 

Copyright © 2012 • ChadsPictures.com

web analytics