|
|
This automotive repair guide is specifically for the 2012 7th generation Toyota Camry map light bulb replacement. But owners of the 6th generation Camry
may also find these do it yourself instructions for how to change the interior light bulb useful as well. The overhead map light assembly is similar and they use the same replacement bulb. This DIY guide is intended to show you how to change the burnt out bulb in a Camry in just a few easy steps.
The map light bulb is the same for the 2007, 2008, 2009, 2010, 2011, 2012, 2013, 2014, 2015, 2016 Toyota Camry (XV40 and XV50) L, LE, XLE, SE, XLE V6, SE V6, and Hybrid and the OEM part number is 2825
or you can use a 194 wedge style replacement bulb which are supplied by many manufactures such as Sylvania, GE
and Wagner and can be purchased at auto parts stores such as Napa, Pep Boys, Autozone, and Advanced Auto Parts. If you wish to go a little more fancy you can purchase and LED light bulb replacement by
companies such as Putco.
Tools Needed: Small flat head screw driver |
|
| |
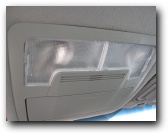
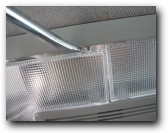
Burnt Out Map Light |
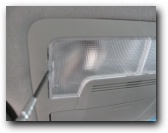
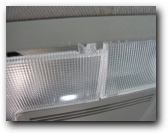
Pry Off Lens Cover |
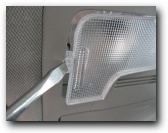
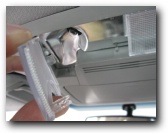
Remove Map Light Cover |
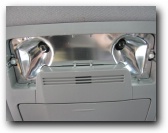
| To change the burnt out map light bulb in the Toyota Camry is very simple. First thing you will need to do is use a small flat head screw driver and
insert the head in between the plastic lens cover and the edge of the overhead light assembly. |
|
Camry Interior Light Cover |
Plastic Map Light Cover |
Camry Front Interior Light |
| Gently pry the front light cover off the front Camry light housing, be sure to use a small enough flat head screw driver so you don't damage the front
dome light assembly like I did. :( |
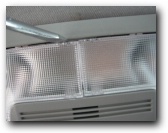
Removed Map Light Cover |
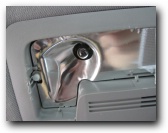
Map Light Bulb 2825 |
Pull Out Burnt Out Bulb |
| Once you remove the lens cover you can see the map light bulb #2825 or 194 and it is easily removed with by pulling down on the bulb with your thumb and index
finger. Be sure that after you replace the burnt out map light bulb that you test the new bulb before replacing the map light cover just in case it does not work. You may also be interested in
other repair guides I have done such as
How to Change the Dome Light in a Toyota Camry,
How to Replace the Headlight in a Toyota Camry,
How to Change the Air Filter in a Toyota Camry,
How to Change the Battery in a Toyota Camry,
How to Change a Fuse in a Toyota Camry. For all the Toyota Camry guides in one place go to
Toyota Camry Repair and Maintenance Guides.
Replacing your interior lights
with LED's is always a good idea as they last longer and give a brighter whiter light then OEM replacement bulbs. This DIY how to guide may also be helpful to owners of other Toyota, Lexus and
Scion models such as the Corolla, Solara, Avalon, Celica, Corona, Cressida, Matrix, Supra, Tercel, Paseo, Venza, MR2, Yaris, Echo, IS 250, ES 350, GS 350, LS 460, IQ, TC, XB, and XD. Always
remember to check your OEM manual for your vehicle before attempting any repairs on your own to make sure you have the proper replacement parts for your vehicle. If you do not have your OEM repair
manual try using the instructions from a Chilton's Manual or a Haynes Manual for further replacement instructions. |
|
|
|
|