|
|
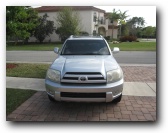
This Toyota battery replacement guide is to show you how to replace the dead engine battery in a Toyota 4Runner SUV that won't start. This guide was specifically written for the 4th
generation 2003, 2004, 2005, 2006, 2007, 2008 and 2009 model Limited 4Runner V6 engine but may also be helpful to owners of all years 2010, 2011, 2012, 2013 and 2014 4 cylinder, 6 cylinder, and the V8
4Runner and Truck. Toyota only used a few battery sizes over the years so this do it yourself guide to change a dead battery in a Toyota 4Runner should be very similar for all car and truck models.
Engine batteries lose cranking power over time and should be checked or changed every 3-4 years for reliability.
The OEM battery group number for the this 2003 Limited 4Runner V6 is a 24F. Please refer to your owners manual for battery sizes and requirements for your year and model Toyota 4Runner
SUV or Truck. You may buy a new replacement engine battery from any auto parts store like Pep Boys, Autozone, NAPA, Advanced Auto Parts, Walmart and Sears Automotive. Read disclaimer.
Tools Needed: 10mm ratcheting socket wrench, 10mm open end combination wrench, 10mm deep well socket, wire battery terminal cleaner brush. |
|
| |
What size battery does a Toyota 4Runner need?
See the Toyota Engine Battery Size Chart at the bottom of the page. |

Toyota 4Runner |
4Runner Front |
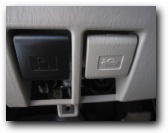
4Runner Hood Release |
| Before you begin removing the battery from the Toyota 4Runner make sure the engine is turned off, cooled down and the keys are removed from the ignition.
The battery is located under the hood in the engine compartment on the driver side so you will need to lift the hood to remove the bad battery. To pop the hood on the 4Runner you will need to
locate the hood release lever inside the vehicle under the steering column on the driver side. |
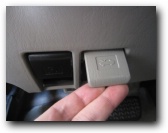
Pull Hood Release |
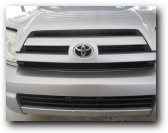
Toyota 4Runner Grill |
Toyota 4Runner Hood Latch |
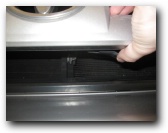
| Lift the hood release until you hear the hood pop. Once you have popped the hood you will need to go to the front of the car and put your hand between the bottom of
the grill and the bumper and feel for the hood latch. Lift up on the hood latch and raise the hood. If your 4Runner does not have the gas filled hood shock supports you will need to use the hood
rod to support the hood. Electrical Shock Warning! Please be careful before you start removing the battery from a Toyota Truck or
SUV, be aware that you can damage your vehicle or yourself if you let anything metal connect the positive and negative battery terminal posts at the same time. Please wear protective gloves if you
have them.
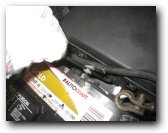
If the battery terminals or battery cables are corroded you can use baking soda and water to help dissolve the excess corrosion. Use a wet tooth brush and baking soda to help
remove the corrosion before you disconnect the battery terminal on the Toyota 4Runner 24F battery. If you do not have baking soda you can also try using Coca Cola (Coke) to remove battery
corrosion. To help prevent corrosion in the future you may want to use felt battery terminal corrosion pads that will help prevent battery post corrosion. |

4Runner Engine Compartment |
Toyota 4Runner 24F Battery |
Negative Battery Post |
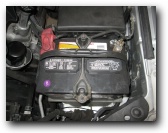
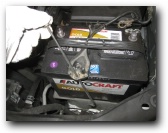
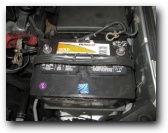
| The battery is located in the engine compartment in the front on the driver's side. Start by removing the Negative "-" battery cable by using a size 10mm socket
wrench to loosen the battery terminal bolt. You only need to loosen the battery cable enough so that you can wiggle it back and forth and slide it off of the negative battery post. Move the
battery cable off to the side of the battery out of the way. |
Remove Negative Battery Terminal |
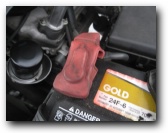
Positive Battery Terminal Cover |
Remove Battery Terminal Boot |
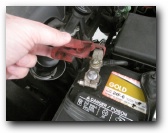
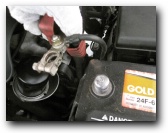
| The positive cable is usually covered by a red battery terminal cover that is made out of rubber. Lift the Toyota positive battery cover off of the positive battery
terminal. |
|
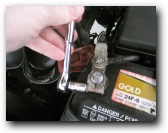
10mm Battery Terminal Bolt |
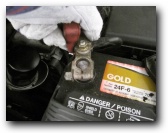
Remove Positive Battery Cable |
Battery Cable Removed |
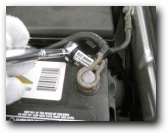
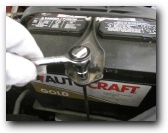
| The positive battery terminal bolt is a 10mm nut that can be loosened with a ratcheting wrench or a crescent wrench if you do not have one. Loosen the hex nut two or
three turns but do not remove the nut from the bolt. To remove the positive battery cable from a Toyota 4Runner you just have to turn it back and forth until you can lift the terminal from the
battery post. Move the positive cable off to the side of the battery so that it is out of the way when you are ready to remove the battery from the engine. |
Toyota Battery Hold Down Bracket |
Remove Battery Hold Down Rod |
Battery Bolt Removal |
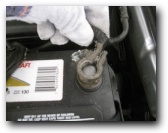
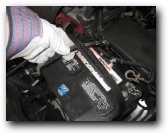
| The battery hold down bracket has two rods that secure it to the battery base plate. The Toyota 4Runner battery hold down rod uses a 10mm nut that can be take off
with a open ended wrench or a deep well socket. The bottom of the hold down bolt has a hook shape (U-shape) that goes through holes in front and back of the battery plate near the battery tray. Once you
remove the bolts you can slide the battery bolt down to free it from the hook and loop. |
Rear Battery Hold Down Bolt |
Disconnected Toyota Battery |
Toyota 4Runner Battery Tray |
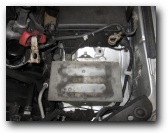
| The back or rear battery rod may be secured to the negative battery cable by a plastic hook that helps hold the battery cable in place. Be sure to remove the cable from the
rod before you free the hold down bolt. After you have removed the Toyota 4Runner battery hold down bracket you may lift the battery out of the engine compartment. If the plastic battery tray is
dirty you should clean it before installing a new battery in the Toyota 4Runner. Follow the reverse instructions to install the new battery. |
Toyota Battery CCA Chart |
Toyota Battery Size Chart |
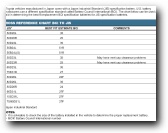
JIS to BCI Cross Reference Chart |
| How often should you change your car battery? That is impossible to say and depends on many different factors and variables that affect battery life and performance.
It is recommended that you have your alternator and battery tested every year just to be safe. Always check your OEM repair manual before attempting any maintenance or repairs on you Toyota 4Runner SUV for proper manufacturer recommended replacement intervals
and after market battery specifications. If you do not have the owners manual for your Toyota you can use a Haynes or Chilton repair manual that can be purchased at most auto part stores. When
buying a new Toyota battery replacement make sure to check the required Cold Cranking Amps or CCA at 0 degrees Fahrenheit for your vehicle make and model. The Group 24, 24F, 25, 27F and 35 are very common Toyota engine
battery sizes and are made by Toyota Truestart, Energizer, Diehard, Interstate Battery, Autocraft, Duralast, Optima and others in a variety of prorated warranties. Most batteries come with a 60,
72, or 84 month prorated warranty. If your battery died within it's warranty you may return it to the store you bought it from for a prorated discount on a new battery. Owners of other Toyota and Lexus Trucks and SUV's like the FJ Cruiser, Highlander, Land Cruiser, Range Rover, RAV4, Sequoia, Sienna, Tacoma, T-100, Tundra, RX, GX
and LX may find this how to change the battery in a Toyota 4Runner helpful as well. For more how to instructions and pictures see the
Toyota 4Runner Maintenance and Repair Guides and the Toyota Camry
Repair and Maintenance Guides for more do it yourself maintenance projects. |
|
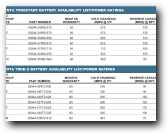
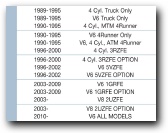
Toyota Truck and 4Runner Battery Size Chart |
| Year Truck or 4Runner |
Engine |
Group Size |
| 2nd Generation - 1989, 1990, 1991, 1992, 1993, 1994, 1995 |
4 Cyl. Truck Only |
25 |
| |
V6 Truck Only |
24 |
| |
4 Cyl., MTM 4Runner |
25 |
| |
V6 4Runner Only |
25 |
| |
V6, 4 Cyl., ATM 4Runner |
24 |
| 3rd Generation - 1996, 1997, 1998, 1999, 2000, 2001, 2002 |
4 Cyl. 3RZFE |
24F |
| |
4 Cyl. 3RZFE Option |
27F |
| |
V6 5VZFE |
35 |
| |
V6 5VZFE Option |
24F |
| 4th Generation - 2003, 2004, 2005, 2006, 2007, 2008, 2009 |
V6 1GRFE |
24F |
| |
V6 1GRFE Option |
27F |
| |
V8 2UZFE |
24F |
| |
V8 2UZFE Option |
27F |
| 5th Generation - 2010, 2011, 2012, 2013, 2014 |
V6 All Models |
24F |
|
|
|